How to Use LUTs in CapCut for Professional Color Grading
Color grading is one of the most powerful elements in video editing. It shapes mood, enhances storytelling, and creates visual identity. Many beginner editors focus only on cuts and transitions, but professionals know that color defines the emotional impact of a video. One of the most efficient ways to achieve cinematic color grading is by using LUTs.
In this comprehensive guide, you will learn what LUTs are, how they work inside CapCut, how to apply them properly, and how to refine your results for professional level output. This article follows practical editing principles used in professional tools such as Adobe Premiere Pro and DaVinci Resolve, adapted specifically for CapCut users.
What Are LUTs in Video Editing
LUT stands for Look Up Table. A LUT is a mathematical file that remaps color values from your original footage to new color values based on a predefined style. In simple words, it transforms the entire color profile of your video in one step.
Instead of manually adjusting exposure, contrast, highlights, shadows, white balance, and color channels, a LUT applies a complete color transformation instantly. This allows creators to achieve cinematic results in seconds.
There are different types of LUTs:
-
Technical LUTs that convert flat or log footage into standard color space
-
Creative LUTs that add stylistic tones such as warm cinematic looks or cool dramatic moods
-
Brand LUTs used for maintaining a consistent aesthetic across content
When used properly, LUTs enhance your video without making it look artificial.
Why LUTs Are Important for Content Creators
Modern platforms like YouTube Shorts, Instagram Reels, and TikTok are highly visual. Viewers scroll quickly, and strong color grading helps your video stand out instantly.
Using LUTs provides several advantages:
- Consistency Across Videos: If you build a content brand, maintaining consistent color tone is essential. LUTs allow you to apply the same aesthetic to every video.
- Faster Workflow: Instead of spending 20 minutes adjusting color manually, a LUT applies a base look in seconds. You then make small refinements.
- Professional Look: Even beginner editors can achieve a cinematic style without advanced color grading knowledge.
- Emotional Control: Warm tones create happiness and comfort. Cool tones create seriousness or mystery. LUTs help control emotional storytelling.
Does CapCut Support Custom LUT Files
Yes, CapCut supports importing LUT files, usually in .cube format. This feature is available in updated versions of the app.
When using LUTs in CapCut:
-
Make sure the file format is .cube
-
Use high quality LUT files from trusted sources
-
Avoid corrupted or poorly designed LUT packs
If you are using advanced or unlocked versions, always ensure the app version is stable to prevent export or rendering errors.
Step by Step Guide to Using LUTs in CapCut
Below is a detailed walkthrough designed for both beginners and intermediate editors.
Step 1: Prepare High Quality Footage
Before applying any LUT, ensure your footage is:
-
Properly exposed
-
Not overexposed or underexposed
-
Shot in good lighting conditions
LUTs enhance existing colors. They cannot fully fix badly shot footage. If lighting is poor, adjust brightness and exposure first.
Step 2: Import Your Video Project
Open CapCut and tap New Project.
Import your clips into the timeline. Organize them properly before starting color grading. Always complete cutting and trimming first. Color grading should be one of the final steps in editing.
Step 3: Select the Clip for Color Grading
Tap on the specific clip in your timeline. If you plan to apply the same LUT to all clips, you can later copy and paste adjustments.
Color grading individual clips allows more precise control.
Step 4: Open the Adjust Panel
Tap on Adjust from the bottom editing menu.
Inside the adjustment section, you will see options such as:
-
Exposure
-
Brightness
-
Contrast
-
Saturation
-
Temperature
-
Tint
-
Sharpen
-
Highlights
-
Shadows
Scroll until you find the LUT option.
Step 5: Import the LUT File
Tap Import LUT.
Navigate to your device storage and select your .cube LUT file. Once selected, CapCut automatically applies the LUT to the clip.
You will instantly notice color transformation.
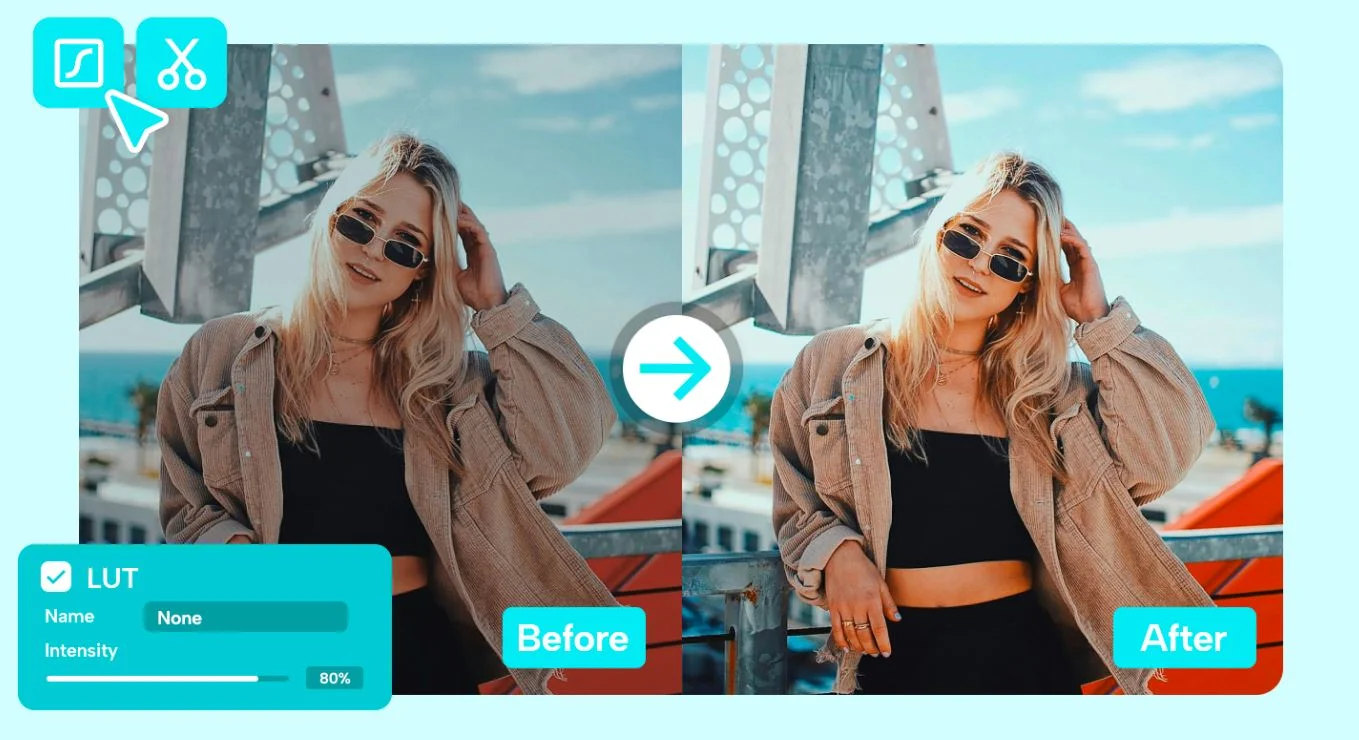
Step 6: Adjust LUT Intensity for Natural Results
Never keep intensity at 100 percent by default.
Most professional editors reduce LUT strength to:
-
40 percent for subtle enhancement
-
60 percent for balanced cinematic style
-
70 to 80 percent for dramatic visuals
Reducing intensity ensures natural skin tones and avoids oversaturation.
Step 7: Fine Tune After Applying LUT
This is the step most beginners skip.
After applying a LUT:
Adjust Exposure: If the video becomes too dark, increase exposure slightly.
Fix Skin Tones: If faces look orange or blue, adjust temperature and tint.
Balance Contrast: If shadows become too harsh, reduce contrast slightly.
Correct Saturation: Too much color can look unrealistic. Reduce saturation if necessary.
Professional color grading is always about subtle adjustments.
Best Practices for Using LUTs in CapCut
Always Start With Basic Corrections
Before applying LUT:
-
Fix white balance
-
Correct exposure
-
Reduce noise if needed
A LUT works best on properly balanced footage.
Do Not Stack Multiple LUTs
Applying multiple LUTs on the same clip can create unnatural results. Instead:
-
Use one LUT as base
-
Fine tune manually
Keep Skin Tones Realistic
Human eyes naturally detect unnatural skin tones. Even cinematic videos maintain realistic facial color.
If skin becomes too orange, reduce temperature.
If skin looks too green, adjust tint.
Maintain Consistency Across Clips
After finishing color grading for one clip:
-
Copy adjustments
-
Paste onto other clips
This ensures visual consistency throughout your project.
Types of LUTs You Can Use in CapCut
Understanding LUT styles helps you choose correctly.
Cinematic LUTs – These create dramatic tones with deep shadows and soft highlights. Often used in storytelling videos and short films.
Teal and Orange LUTs – Popular in blockbuster style films. Shadows shift toward teal while highlights and skin tones move toward orange.
Vintage Film LUTs – These create faded colors, lower contrast, and nostalgic atmosphere.
Travel LUTs – Enhance blues and greens. Ideal for outdoor and landscape content.
Moody LUTs – Dark shadows and cool tones create emotional depth, suitable for dramatic edits.
Where to Find High Quality LUTs
You can get LUTs from:
-
Professional creators selling preset packs
-
Video editing resource websites
-
YouTube creator download links
-
Photography platforms
When choosing LUTs:
-
Check preview images
-
Read reviews
-
Avoid low quality free packs that overprocess colors
High quality LUTs are usually designed for balanced color grading, not extreme effects.
Common Problems and How to Fix Them
Problem: LUT Makes Video Too Dark
Solution: Increase exposure and slightly reduce contrast.
Problem: Colors Look Washed Out
Solution: Increase saturation slightly and adjust highlights.
Problem: Skin Looks Unnatural
Solution: Adjust temperature and tint carefully until natural tone returns.
Problem: Video Looks Overprocessed
Solution: Reduce LUT intensity and simplify adjustments.
Advanced Color Grading Workflow in CapCut
If you want professional results, follow this order:
-
Basic correction
-
Apply LUT
-
Adjust intensity
-
Fine tune contrast and saturation
-
Add subtle sharpening
-
Export in high quality
This structured workflow ensures balanced color grading.
Export Settings After Using LUTs
After color grading:
-
Export in highest resolution available
-
Choose high bitrate if available
-
Avoid heavy compression
Color grading loses quality if export settings are too low.
Building Your Own Signature Look
As a content creator, building a unique color style helps audience recognition.
You can:
-
Create your own manual adjustments
-
Save them as presets
-
Apply consistently across projects
Over time, viewers associate your content with your color style. That builds brand authority and visual identity.
Final Thoughts
Using LUTs in CapCut is one of the easiest ways to achieve professional cinematic color grading on mobile devices. When used properly, LUTs save time, maintain consistency, and improve overall visual storytelling.
Remember that LUTs are tools, not magic solutions. The best results come from balanced footage, subtle intensity control, and careful fine tuning.
Mastering LUTs will elevate your editing skills from beginner level to professional standard. If you want, I can next create a complete CapCut Color Grading Masterclass style article or a guide on creating cinematic looks manually without LUTs.